Wednesday 26 November 2014

Birthday/Wedding Celebration #OOTN

So last weekend on Saturday I was a birthday girl! Yes thats right that one time a year you get spoilt for just being born! I am now 26 years old... and feeling even older than that some days! On my birthday a friend of mine was getting married and I had been invited to their wedding reception at night. This made me happy that I was going to be apart of their special day, but at the same time it brought fear as I had no idea what to wear! 
On the weeks coming unto my birthday I had searched all the high street shops and could not find anything that caught my eye. I was so stressed out but then it hit me... I decided to wear a dress that I had had brought for me a few months ago that was still brand new hanging up in my closet; I had just completely forgot that I had it! This was perfect, until I realised that I actually had no shoes to go with it, and so on my actual birthday I spent 5 hours actually looking for THE perfect shoes to match! I was so glad that I managed to find some as if I couldn't I would of had to of gone back to square one and found something different to wear!
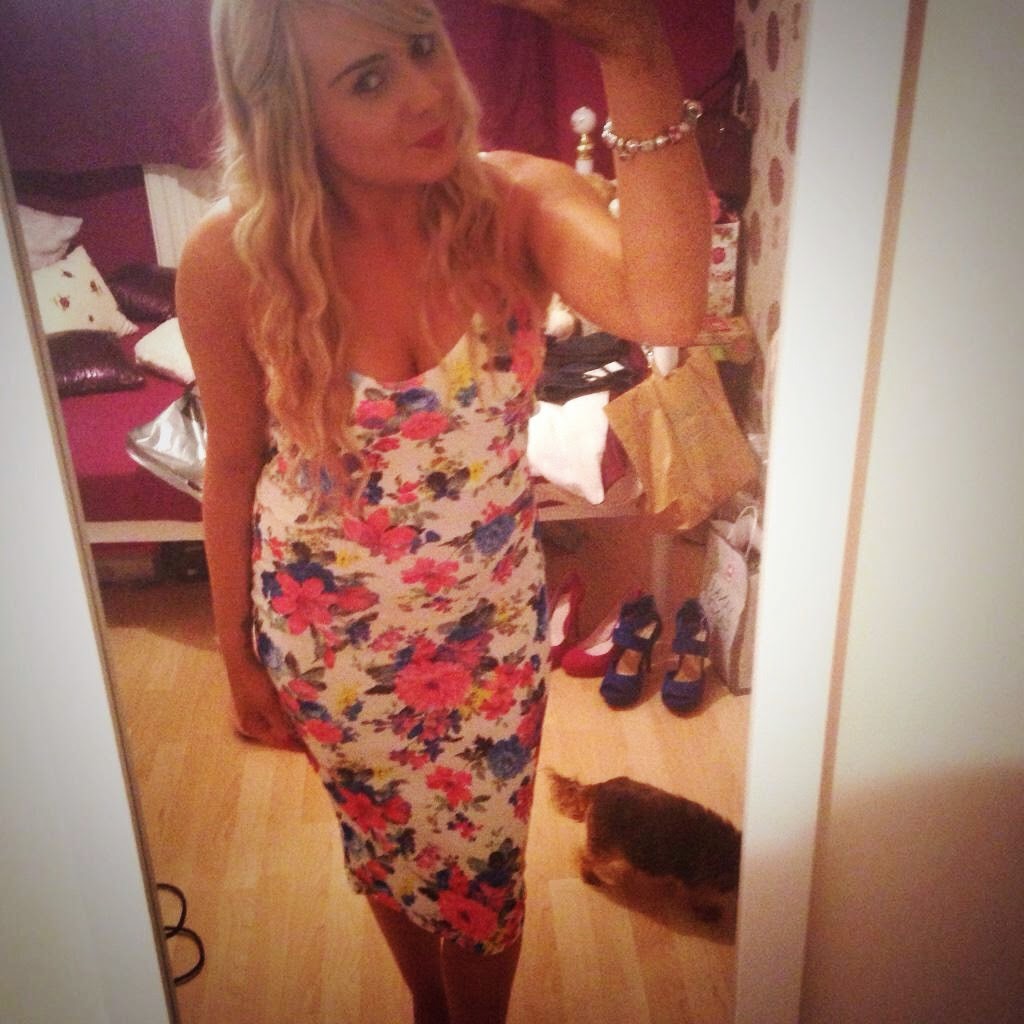
Heres a few photos of my chosen look, please ignore my messy room.. these are just a few quick shots before I headed off to the party to I apologise for the poor quality.


1. Bodycon Dress: GLANCE - £5.00!
2. Pink Court Shoes: FAITH from DEBENHAMS - £22.50 (sale)
3. Gold Clutch Bag: MARC JACOBS - £ unknown as it was a birthday present
*Jewellery by New Look & Pandora*

1. The Dress


 I absolutely love this dress, and no I haven't made a typo error above, it literally was £5.00! There has been so many of these types of dresses flying around lately in different colours and designs... but they're all the same at the end of the day when it comes to the style and shape and some were ranging from £10 to £40 that id seen. I saw this in a local shop of ours which has now unfortunately shut down and as soon as I saw the £5 sign I was sold! I love the colour of it and I love the floral pattern. I thought this was perfect for a wedding. My only worry was that it sticks to you so it shows up all your 'lumps and bumps'... but I popped it on and had a few drinks and my worries went away!

2. The Shoes


When I mentioned above that I had spent so many hours looking for some pink shoes, I literally had! I had been to so many different shoe shops and none had any in that were of any pink shade! I actually started to get upset, and I even went into one shop - found pink ones but then they didn't have my size! I eventually came across these beauties above, and they were in the sale and in a size 5! I could of jumped for joy! Debenhams was my saviour! These shoes are by Faith and were half price in the sale for £22.50. I love the deep colour of them and pink is my favourite colour so now Im happy that I actually own a pair of pink shoes!

3 & 4. The bag & the watch!


 I have had this watch for over 3 years now and it was my first ever Marc Jacobs love! I love the white leather strap and the gold facia, I think it looks so rich and goes with so many different outfits. I was lucky enough to of had the gold clutch bag brought me for my birthday which I think is a perfect match for my watch! I know that the watch cost £160 but I am unsure of how much the clutch was. I cannot wait to style these again at christmas! 

No outfit is complete without having lush nails... and so here was my #NOTN!


False Nails - Primark - £1.00!

Seen as these were pink they were a must have to complete my outfit, and them being glittery just sold it to me even more! I put these nails on on Saturday night and it is now Wednesday night and not one has come off! *touch wood*. I think these nails are such good quality for the price you really can't complain. You can see more of these nails in a recent post of mine here.

So there it is, my birthday/wedding outfit! Im really looking forward to styling more outfits ready for the upcoming christmas season. The thing I love most about this outfit is that it was all on a budget and doesn't brake the bank!


Have you got your party dress ready?


xxxxx

Tuesday 25 November 2014

HD Brows: my first treatment review!


I have never really been a girl who looked after her eyebrows *shameful*. I have always admired other peoples, and always wanted nice eyebrows but after going to different salons having them waxed I just grew to think 'they will always look the same'. As your all probably aware, HD Brows entered the scene and everyone has gone MAD for them! I had no idea what these were, where to get them done, or how much they would cost. For a while I brushed off the thought of having any, but then I saw lots of girls posting pictures on Instagram with them and I then developed HD Brow envy!. 
Luckily a few weeks ago I saw that a lovely girl called Abbie who I met through a friend at uni had qualified in this, and she started to put up before and after photos of the work she had been doing. This sold it to me, I needed those brows! I decided to contact her to find out more about them. Abbie told me that they were completely harmless, easy to do and almost always get the best results. I was told that I would need a patch test before having my eyebrows done just to make sure I was okay to have the tint on them, and that I wasn't allergic in any way. Abbie kindly sent me one of these out free of charge through the post. Here it is below:


So here was my patch test. It came in a cute little pouch which contained the patch test itself and an instruction booklet. This patch test is so so easy to use and takes only a few seconds to apply.


As you can see above, the patch test is just a little transfer that you peel off a sheet, place it on your skin (can be arm near the wrist or just below the elbow), wet it until it is all covered then hold for about 30 seconds until the paper just slides away from it - a bit like one of those transfer ticket tattoos you can get. Once the transfer is on it is important not to get it wet for 48hours. I originally thought that these change colour if you become sensitive or allergic to the dye, but it doesn't it is just to see if you get any irritation to the skin from it like itching or burning, or more importantly a rash. If any of these symptoms occur it tells you in the instruction booklet what to do, and then unfortunately the dye is not for you. I have such sensitive skin and I was really worried that I wouldn't be able to get my brows done, but I was completely fine!
After the 48 hours was up and I had no reaction to the patch test I knew my next move was to book an appointment with Abbie asap. I booked in my appoinment and couldn't count down the days fast enough to getting my brows done. Abbie has recently started working at a lovely little hair and beauty salon called The Strand. This is based in Cheadle in Stoke on Trent.  You can find your local HD Brow Stylist by clicking here.
When I went to The Strand I was greeted by the hairdresser who told me to take a seat while I waited for Abbie to finish with her previous client. The salon is beautiful, and so modern and clean! I knew the price that I was going to be charged before hand; £20 as an introductory offer, bargain! I was so excited. 


Upon having my eyebrows done I learnt that there was basically 7 simple steps to creating the perfect HD Brow. They are as follows:

1. Consultation -  When I went in I entered a beautiful beauty room which was spotless clean and looked lovely and professional. Abbie  helped me to determine which brow shape would suit my face seen as there are lots of different shapes and sizes, and what colour I would like my brows to be; cool, warm etc. Then there is a few forms to fill in - just little basic details about any medical info they may need to know etc. My eyebrow make-up was taken off to ensure the skin around them was nice and clean to start the process.  
2. Tinting – Once I had chosen the colour of the tint that I wanted the dye was left on for a minute and was then swept off with cotton pads just to get off any excess. Your eyebrows also get stencilled to measure up for the sizing, and to help find that beautifully shape. 
3. Waxing – This bit is pretty straight forward. I have had my eyebrows waxed before and I find it less painful than tweezing so I was completely fine with this.  
4. Trimming – Next my eyebrows were combed through and trimmed to ensure they were both the same size etc.  
5. Threading – I have seen so many girls have their eyebrows threaded and it left them so red and they looked like they were in so so much pain! This is the part I was most scared of because I am a wimp anyway so the thought of being in pain around the eye area was the only off-putting thought for me. Threading is used above the brow and basically just gets rid of any unwanted 'fluff'.  
6. Tweezing – After all this it was time to get the tweezers out and I hate tweezers. As soon as plucking begins my eyes start to water but I just took deep breaths in and got on with it as I knew the result would be worth it in the end. My eyes did intact water which made my mascara run into my eyes... but I was fine and it was over with in seconds!  
7. Aftercare – Abbie then ran me through how to care for my fab new brows. I was asked several times about the shape, the colour of the tint and whether or not I was happy. She was really friendly with me and just wanted the best for me and my chosen eyebrow look. I stood up and she filled in any sparse areas with the HD brow kit. She also showed me how to make the most of my eyebrows with the makeup so that I knew how to do it in the following weeks until I re-book in again for maintenance. 

Here are some photos of the before, during and after looks of my eyebrows!


^^^.Before.^^^


^^^.During.^^^


 ^^^.After.^^^


^^^.After.^^^

I am so thankful to Abbie and Im so glad I went through with it and had them done. She has been so friendly and works magic! If any of you live nearby you should definitely make an appointment to see her if your thinking of having your eyebrows done!
I absolutely love my eyebrows and I have had SO many people comment on them. I feel like they have really defined my face, and now even when I have zero makeup on I now feel comfortable to a certain level as I know my eyebrows are done :) I would really recommend HD Brows, they're so easy to achieve and if you don't get your wanted look after your first session, it can be achieved later on down the line with some patience.
I am booked in for 5 weeks prior to my appointment for some maintenance work as it is recommended every 4 weeks but due to christmas coming up meaning a hectic schedule at work I was allowed to stretch to 5 weeks. I can't wait to go back, I have had them done now for 2 weeks and they still look just as fab as they did in the first place!

You can find out more about HD Brows by visiting there website or using the link here.
You can also check out The Strand Hair & Beauty Salon by visiting them on Facebook here.
Abbie is available on Facebook & Instagram...  and she works her magic on lots of beauty work including fab nails! Just click the links to find out more!
Abbie Victoria Beauty & Nails - FACEBOOK
Abbie Victoria Beauty & Nails - Instagram 


Are you a HD Brow lover? Have you had them done?


xxxxxx

Link within

Related Posts Plugin for WordPress, Blogger...