Monday 30 March 2015

Halo Hair Extensions - Part 2

So hopefully you will of all seen Part 1 of my Halo Hair Extensions post... Here I bring to you Part 2! In this post I will be including some before and after shots of my hair, and a simple step by step guide to applying your halo extensions and achieving a natural look!
Here is me with my normal day to day hair! No hair extensions; all real! I hate my hair because It never grows past a certain length and so because of this I love to invest in hair extensions to give it more length and volume. I have tried everything to get my hair to grow but as much as it must do because I get roots, it never seems to get any longer!


What you will need to create your new look!
To help you easily apply your new Halo Hair Extensions you will need a brush, a parting comb, some clips and your straighteners if your going for the 'straight hair' look. For the purpose of this post I am keeping my hair straight to show an everyday look.


I love that Halo Hair Extensions include instructions with their products. Even if you know what you are doing with extensions and can apply them with your eyes closed; its good to have something to look back on. These instructions provide you with general guidance on how to apply your halo hair. Some people choose to apply theirs in different ways, its completely up to you as you will know where your hair needs more extensions once you start to put them in. 
*Please ignore my horrendous roots in photos that you are about to see, I am booked in and waiting to get my hair done- which can't come quick enough!! Also the lighting is funny in some of the photos as today has been quite a gloomy day and it has gone from dull to sunny to dull and so on. Some of the photos you see you may think 'omg those extensions do not match her hair colour' but trust me they do. I just have so many different blonde/brown shades in my hair and like I mentioned above the lighting shows them in different colours. The end product photos are more natural and you can see the colour match much clearer*

Step 1
Gathering your Halo Hair Extensions together.

When I get new hair extensions, I am always so excited to open them! First you need to untie them from the packet.  Be careful that you do not cut any hair off when trying to cut the ties!


The next thing I like to do when applying my hair is sort out the extensions into piles which have the same amount of clips in. This just makes applying them easier as you can see which ones you still have left in terms of width.


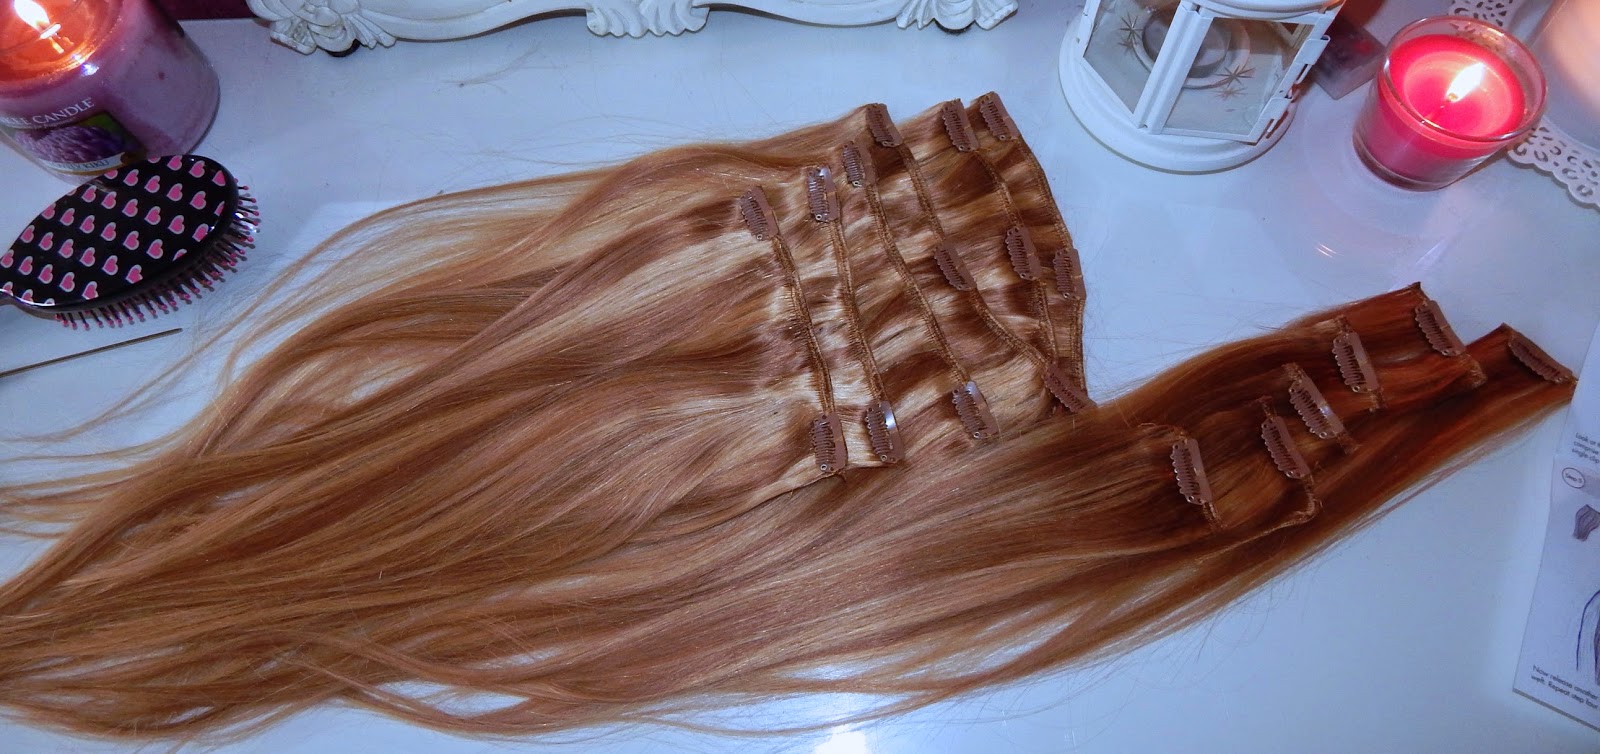
These extensions as mentioned in my Halo Hair Extensions Part 1 post are in the shade Golden Brown/Sweedish Blonde Mix - #12/20. They are 20" long, and cost £99.99 to buy as part of their Deluxe clip- in set. The photo above shows them to be a lot more browner than blonde, but they aren't its literally just the lighting. They are a lovely mix of brown and blonde shades.

Step 2
Applying your Halo Hair Extensions.

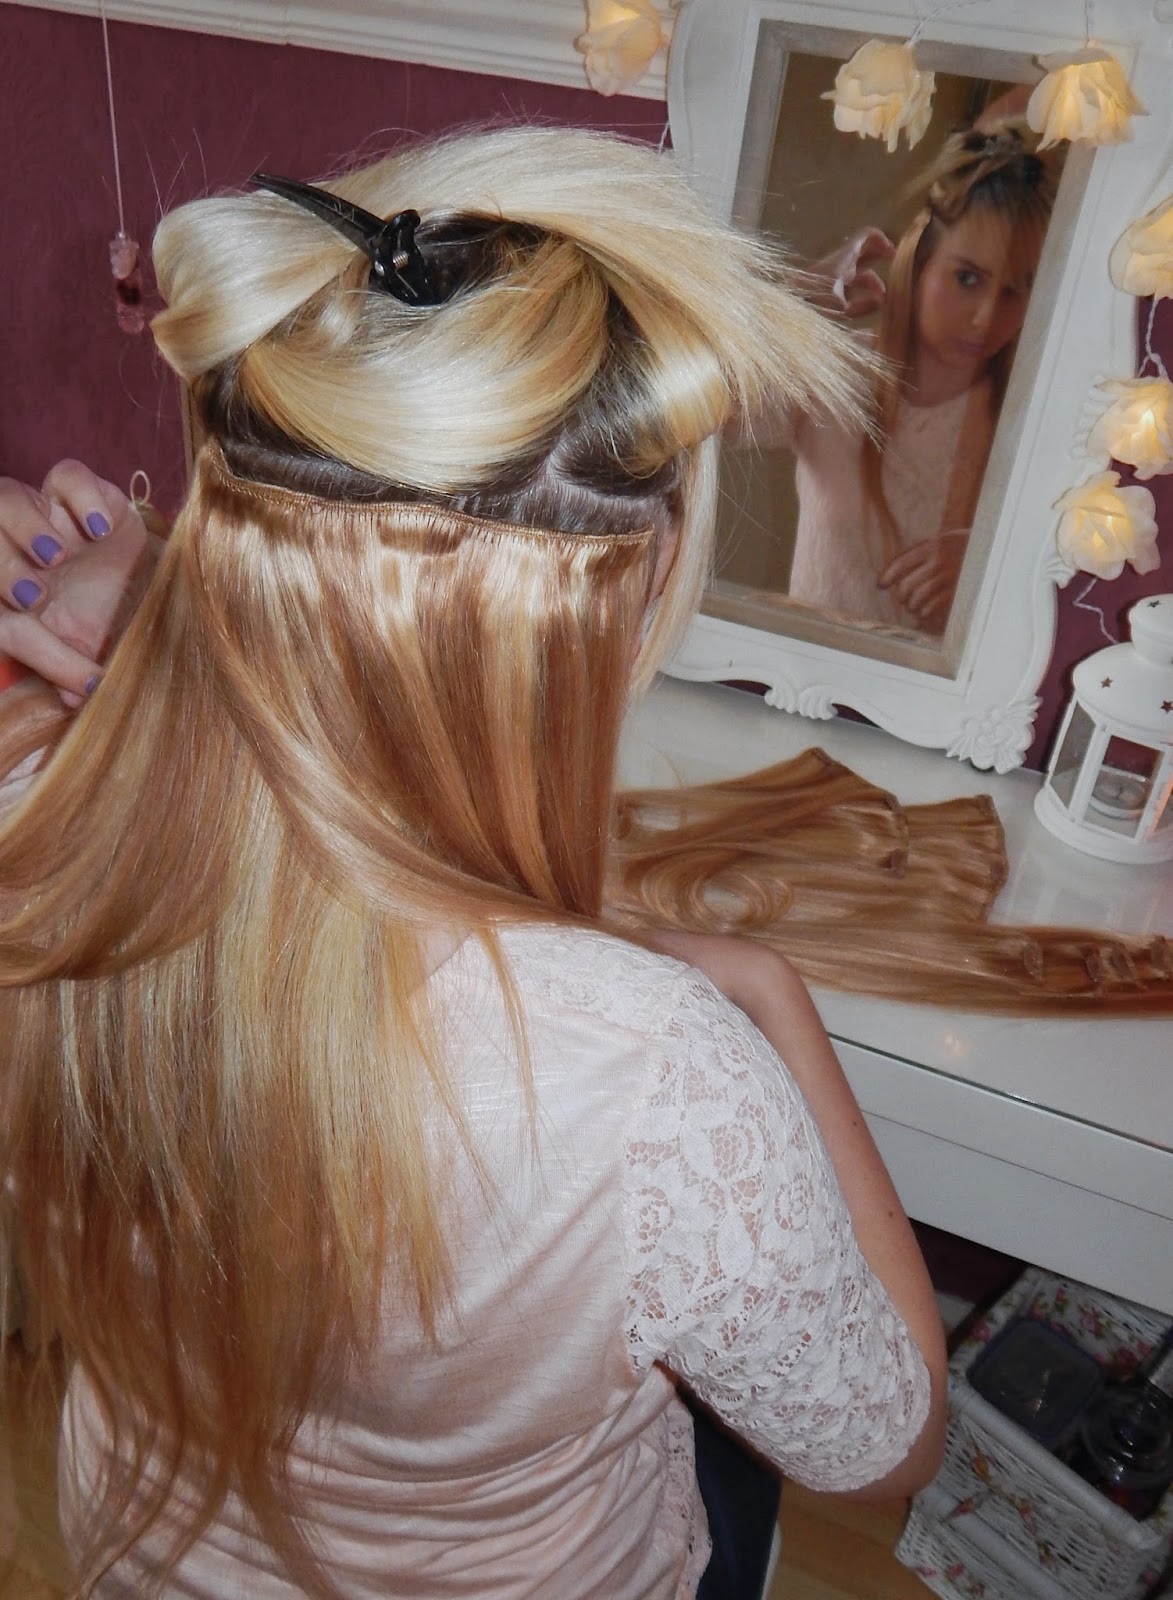
First either using your fingers or a separating comb, tie up the majority of your hair leaving the bottom strand free. The idea with extensions is that you work your way from the bottom up to the top.  Here are those nasty roots that I have warned you about... I have been trying to be good and not get my hair coloured as much to try and let it grow, but because of that I now have major root-age going on! This post is as real as it comes, I obviously could not hide away my roots as I needed to show a separation of the hair picture. We're all girls anyway right and have seen them before?!


After separating your hair and clipping it up, you need to start off with the extensions that contain 'two clips'. The set that I am using is a Deluxe set and contains 12 hair pieces! Perfect for my hair because its so thick. Pick up the extensions piece, open the clips and grab them onto your hair then close them. Its as simple as that!


Here you can see the fitting close up. I attach them right to the top of the hair as this prevents them from slipping down and gives a tighter fitting. Once you have applied your first one. Separate and pull another layer of hair down and do the exact same as above. You use all of your 'two clip' pieces until you get to the top of your ears.


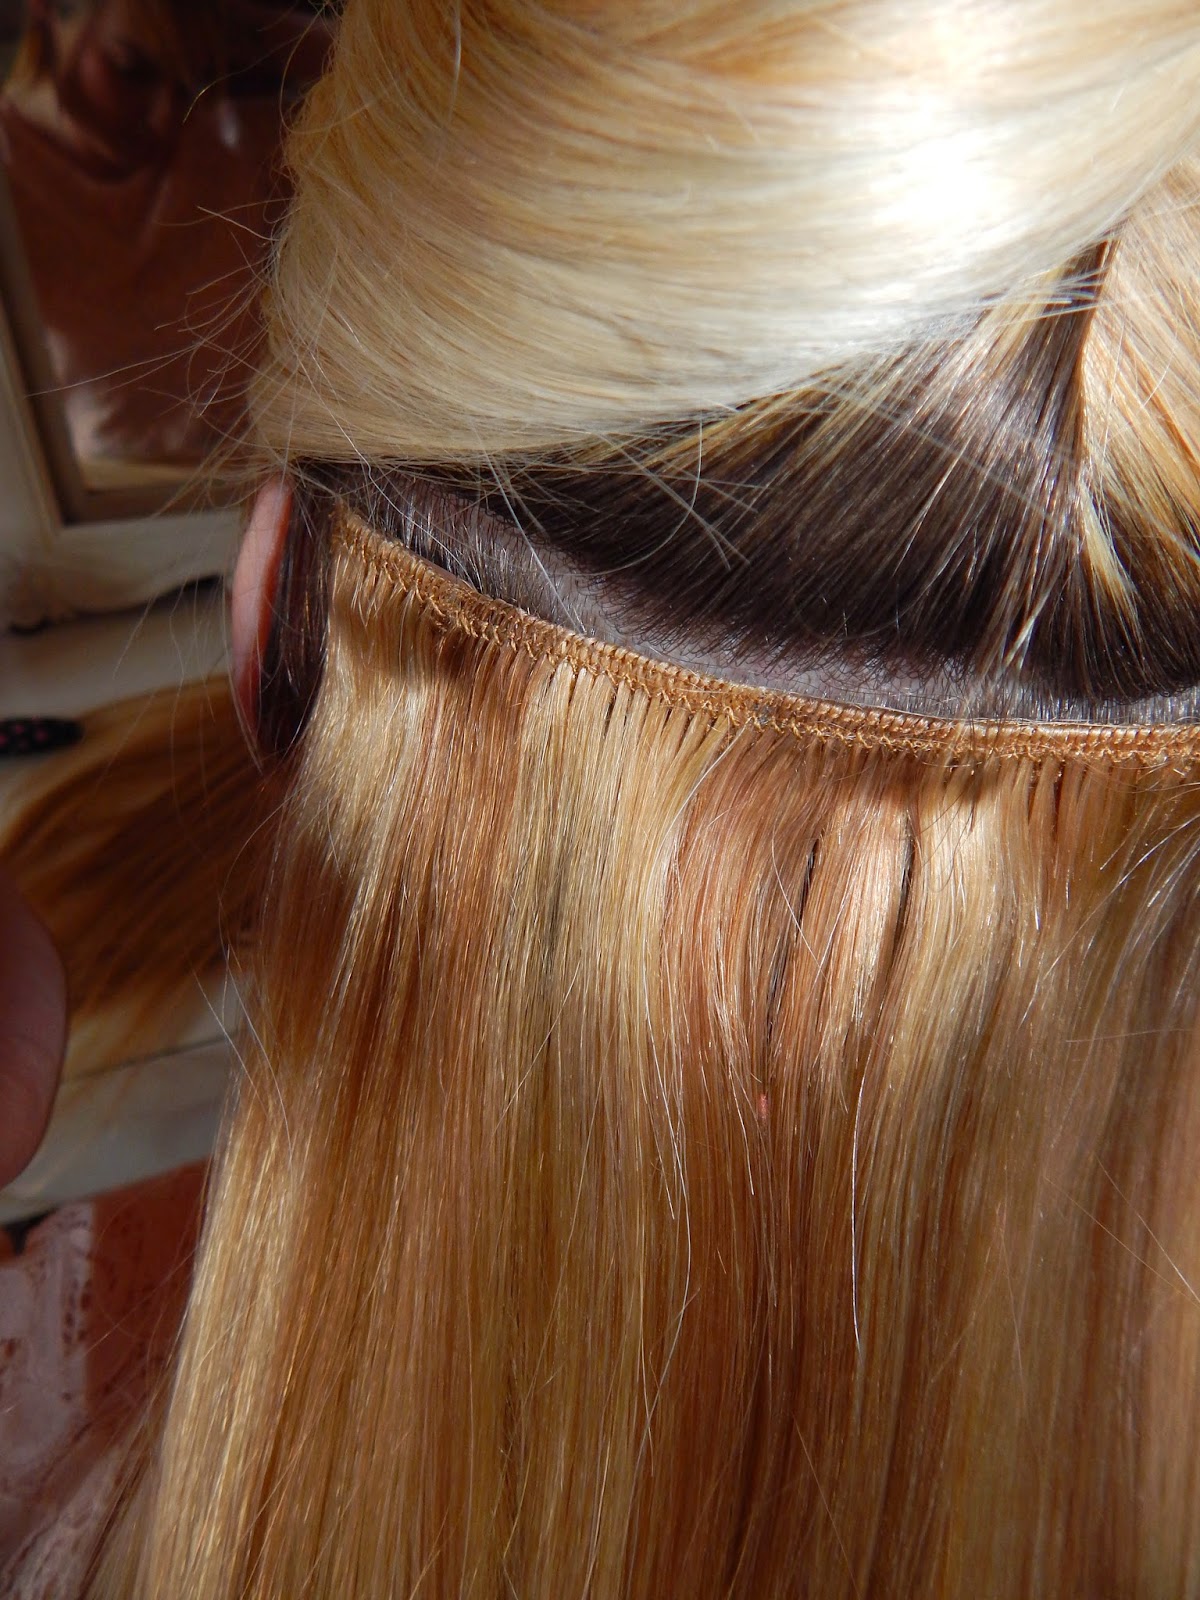
What I have noticed when applying my Halo Hair Extensions is that the clips are firmly attached to the extensions. I have brought some hair before where the clips were originally attached, but after applying them they became loose and eventually I had to sow them back on. This is not what you want when you pay out all that money for lovely hair. These clips are attached well and you can really feel the grip when you place them in your hair. 
Once you have used up your 'two clip' hair pieces. Its time to move onto the pieces of hair that contain 3 clips. These are wider to fit around your head as you continue to work your way up to the top of the hair. Separate your hair now so that all the hair that is above your ears is clipped up. This is obviously the middle part and for me this is my main area where I need to apply lots of hair pieces to keep it looking natural with my hair being so thick. 


 The hair pieces with 3 clips attached are my absolute fav. This is because they cover almost all of your own hair, meaning it is all hidden and you start to see the beautiful hair that you are now wearing! Start from the side and work your way around placing in your '3 clips' pieces. Once you have covered the layer of hair all around ... separate and pull another layer down and do the same again! You should use all of the '3 clip' pieces, and hopefully like me you will find that now all of your hair has been filled with your new halo! Once you have finished these steps pull down the last top layer of your own hair and it should hopefully blend in with your long locks!
After concentrating on the back of your head, its time to finish off by using the '1 clip' pieces to fill in from the front your hair that is around your face. 
Here you can see what I mean about the lighting from todays weather! Excusing that... once you have used your single clip-ins at the sides of your face... Your halo is officially in!


Step 3
Styling your new halo hair!

There are so many different styles you can create when you have long hair. For me my two favourite styles are straight and wavy. I like to keep it simple as just having that added 20" long hair is a bonus alone for me, and Im happy to keep it plain and simple. Start by brushing your hair. This blends in any of your own natural hair that may be poking out. I sometimes have to separate my hair at the sides again to straighten it out which is what you can see me doing below. 


For this post I chose to keep it straight to show a natural day to day style as I mentioned at the beginning, but here is how I finished off my look...


 I absolutely love my Halo Hair Extensions. Regardless of some of the funny shades of lighting on my photos, from the two above you can see how naturally they blend in with the rest of my hair. I love a mixed blonde look rather that one plain colour. Not only do I now have lovely long hair, the actual hair itself that is 100% Indian Remy Human Hair is so so soft!

Here are some before and after photos for you to see the difference a halo can make! I have loved being a part of Project Halo!


*You can find Halo Hair Extensions using the following links*
xxxx
*This post comes to you as a review - products sent to me by Halo Hair Extensions in relation to Project Halo*

Sunday 29 March 2015

Halo Hair Extensions - Part I

So after lusting over long hair and wanting some new hair extensions, Ive finally got myself some new ones thanks to 'Project Halo'. I have been given a great opportunity to work with Halo Hair Extensions :) Im forever looking at different companies for hair extensions but Im always really wary of ordering any online without seeing them and making sure they match my hair colour. After discovering Halo Hair Extensions I was amazed at there products online. They have so much variety to choose from! So who are Halo Hair Extensions?
Halo Hair Extensions is an online company working to provide girls with the best Halo in town; their motto "Every girl deserves a halo''. I certainly need a Halo as my hair is awful without any extensions in and is simply plain boring. You can find their website here. They provide hair that is '100% Indian Remy Human Hair' as they believe 'they are the finest extensions in the world'. Their website is really helpful. There are so many links available to you from customer reviews, how to videos,  the actual products available to buy, help on choosing the correct shade of hair; and so much more!
Halo Hair Extensions provide four main options of hair to choose from; Halo, Deluxe Halo, Clip-In & Deluxe Clip-In. They also offer micro loop and stick tip, but you can find out more about these online. After a few emails discussing what kind of hair I would like and what colour we thought was best, I was amazed at how fast I received my parcel! I was so excited when the post man knocked on my door with their distinctive packaging!


Heres a few photos of my first views when opening my Halo Hair Extensions. I knew straight away I had got my halo delivery thanks to their clear packaging! I love the big logo on the front of the box, it makes it stand out.


When I opened the box I smiled instantly.. How pretty did it look! You can tell that time, effort and care has been taken when packing their products. I think that presentation is such a vital element for companies. They need they products to live up to their name, but I think its also important to make sure they are presented in the best way possible. When I opened my box I saw beautiful purple tissue paper that was wrapped around my hair extensions with such a pretty bow! They even included some halo shampoo and conditioner, and a comb to help maintain the hair! 


Along side the lovely extra treats included , another vital thing was inside; instructions. Everyone needs instructions, just incase! Even if your a pro and know what your doing, its always good to have something to look back on! These tell you how to apply your hair, and also include tips on how to keep them looking nice and healthy!


I was super impressed when I saw that Halo Hair Extensions had included shampoo and conditioner in their parcel, and also a comb! Their mini bottles are super cute and of course have their trusty brand names on them! The comb that they have included is fab for applying hair extensions as it allows you to neatly section your hair into parts. 


Once I could allow myself to tear away the pretty purple tissue paper, I then saw my halo. There it was boxed up nice and safe waiting for me! 


Once again the packaging I cannot fault at all. Not only does it tell you a little bit about your halo, it also includes links to where you can find them if you need any help!


I decided to choose the GOLDEN BROWN SWEEDISH BLONDE MIX #12/20 shade purley because my hair is so many mixed colours. Overall I would say it is blonde, but it has a lot of different shades of blondes and also some browny shades mixed in too. I think these will be a perfect match and I can't wait to try them out. Don't worry if you choose a shade and once it arrives you think it is totally the wrong match for your hair.. as long as you do not untie them from the box you can change them! These extensions are a Deluxe set- meaning they are thicker for those with thicker hair. My hair is short but so thick, so I really needed this set. Its important to get the right amount of hair you need to make it look as real as possible. 
I chose clip ins out of the other products that were available because I am used to them. I have seen so many girls wearing extensions with their clips still visible, its the only downside to them. This can be avoided though if you place them in correctly, and its super easy. My 20" extensions have 21 clips and contain 12 pieces of hair. The clips are already attached so you don't need to worry about doing this yourself... they have done all the hard work for you! As mentioned above the hair is 100% Indian Remy hair, giving super quality. I think £99.99 for these is a bargain, because in the past I have been paying this for hair that is not this long, does not come with as many clips, isn't as thick and also doesn't come with any added extras! When you buy your halo they really look after you!


I will be doing a part II post for my Halo Hair Extensions which will focus on how to apply them, and before and after shots.. so be sure to check back!

In the mean time you can find out more about Halo Hair Extensions and their fabulous products using the following links!

Will you be ordering yourself a halo?

xxxxxx

*This post comes to you as a review - products sent to me by Halo Hair Extensions in relation to Project Halo*

Sunday 22 March 2015

Todays #ootd ... white maybe the new black?!

So today the sun was shining, what better day than to wear white! Im obsessed with black and if I am honest and own up I probably own a little too much... but then can you have too much black in your closet?? White is going to be on trend for summer and its starting to enter a lot of high street shops already. For me white is a iffy colour. I love to see it especially when the sun is shining, but I just feel it exposes you more.. and you can't hide away in it like you can in black! 
I recently brought an amazing long oversized sleeveless white jacket from New Look. Today seemed like the perfect day to wear it for the first time and to try and get used to wearing white ready for the upcoming summer weeks!
Heres my full #ootd !


Cameo Rose White Sleeveless Jacket - NEW LOOK - £17.99
Grey Long Sleeved Tee - PRIMARK - £3.50
LIZZIE Clean Indigo Jean - MISS SELFRIDGES - £38.00
Converse - SOLE TRADER - £44.99


I love that this has a collared front, draws your eye to the casual fit yet smart look. 


What I love most about this jacket is that it is so versatile. It can be worn in a formal way, or as I've styled it today in an casual way! I love the pocket detailing.. although that is a trick as there is actually no pockets, but I love that it looks like they're super big! The length of this is perfect and its so comfy and moves freely when you wear it. I chose to pair it with some skinny jeans and converse today  just because its Sunday and I felt like having a casual day! I think this would also look lovely paired with some patterned leggings and ankle boots, and also a long sleeved swing dress!


I can't wait to wear this sleeveless jacket again with a different outfit. It almost certainly put a smile on my face today with the sun being out! New Look also stock this in a camel colour which you can find here. There is literally so much white in the shops now and I think I'm going to brave it and splash out on some more to lighten up my wardrobe. 

I chose to spend today having a walk around, then I had a little trip to Costa to enjoy a lovely drink! I hope you all had a fab Sunday and are looking forward to a brand new week!
You can find links to all my items featured in this post above. 


What are your thoughts on white? Are you brave enough to ditch the black in your wardrobe for summer?
xxxx

Thursday 19 March 2015

Jump for the Ark angel! #ootn!

I have always loved jumpsuits, but feared with me being small I could never get away with wearing one. There has been so many lovely jumpsuits in the shops just recently, ranging from different colours and patterns. Every time I spotted one I would head over to it and say to myself "gosh I really want this"... but I always ended up walking away. There have also been so many I have liked online and especially on Instagram!
On a recent trip to Manchester I went into their local Ark store, and I fell in love. There in front of me was one particular jumpsuit that I had had my eye on for a while! I was feeling brave, picked up a s/m and headed straight to the till before I could change my mind!
Upon getting this beauty home and trying it on I instantly loved it even more! Heres how I styled it...


Jumpsuit - Ark - £15.00 (sale)
Black open toe heels - Dorothy Perkins - £24.99 (had for a few years)
Marc Jacobs clutch - Tk Maxx - £ unknown (present)

I always go into Ark whenever I'm in manchester. I hate that we do not have a store where I live, but it just makes it more exciting for when I can visit as they always have the hottest on the trend clothing! What I love most about this jumpsuit is that for one it is black! I am obsessed with black clothes and I can never shake the habit of buying black! I love the floral detail on this which I feel helps take away the eye from how short I am! This jumpsuit is so so comfy to wear, it literally feels like Im walking around wearing a onesie! Its perfect for the upcoming summer days and nights. I also really like that paired with some heels and a clutch it makes the perfect outfit for a night out with minimal effort! This jumpsuit was a bargain at £15 in the sale I just couldn't say no! I chose to wear some black open toe heels with it just to make me feel a little taller with only being short. I have seen this particular style and pattern in Quiz when shopping too! Heres a few pictures from getting ready for a meal out wearing my first ever jumpsuit!


This particular jumpsuit is no longer on Ark's website, but Im sure if you hurry to store they may have some left! Failing that they do have some other beautiful jumpsuits (also on sale) on their website which you can find here.

Are jumpsuits a hit or miss for you?


xxxxxx


Link within

Related Posts Plugin for WordPress, Blogger...